RapidShare HACKING

Thursday, November 8, 2007

Most Trusted n Complete Working HACK


Simply Copy the CODE given below
Open Command prompt. ( run ->cmd )
Paste the Content There. [ Hope u know how to paste on the cmd Prompt ]
Now try the rapidshare link again
and it wont ask you to Wait for more than ONE minute.


@echo off

echo ipconfig /flushdns

ipconfig /flushdns

echo ipconfig /release

ipconfig /release

echo ipconfig /renew

ipconfig /renew

exit


Check this out people........Easiest thing to do!

Absolutely it works..
This topic is ment for ETHICAl hacking!

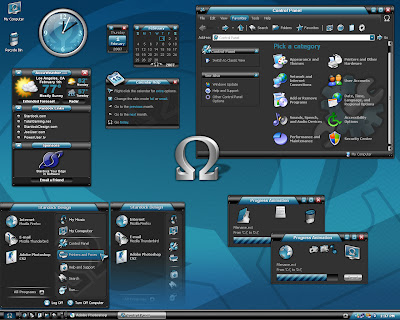
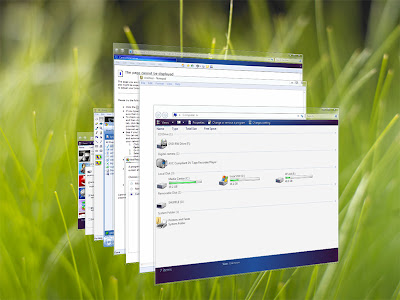
Hack XP to look like Vista


Well, lets face it. I don’t want to jump to Vista Bandwagon just now but I envy the way it looks. There are ways to hack your stable and trusted Windows XP to look and behave like Vista.

1. First you need to find out which Service Pack you are running. To do this simple press the Windows flag key+Pause/Break key. This is going to open the system properties window. Here it is going to say which service pack you are running

2. Now you have some downloading to do. First get: The appropriate Uxtheme.dll file If you are running Service Pack 1 then get this file.If you are running Service Pack 2 then get this file.

3. Unzip the file to your desktop

4. Now you need to download the Replacer(I recommend getting a stable version). The replacer efficiently replaces your system files and is supposed to be completely safe. This program also backs up your file in case you need to revert the changes.

5. Unzip the Replacer to your desktop. Make sure you read the “readme” because it has some important tips on how to revert those changes that you made. Now you are ready to replace your uxtheme.dll file

1. Now double click on the replacer file (replacer.cmd)
2. Then it will ask you to drag and drop the original system file you want to replace. So go to the System32 folder and somewhere near the bottom you are going to see the uxtheme.dll file. Drag and drop it into the window. Note: your computer may have more than 1 uxtheme.dll file but usually the file that you computer is using is the one in the system32 folder. (usually the location for your Uxtheme.dll file is C:\WINDOWS\system32\uxtheme.dll)

3. Press Enter

4. Then it will ask you to drag the file you want to replace. Open the folder with the downloaded file and drag and drop the file into replacer.

5. Now it will ask you to confirm that you want to replace the files or not. So double check and then press enter.

Replacer will now swap your original file with the new one. Now restart your computer. Congratulations you can now use custom msstyle themes on your computer. Which is going to make your computer look super cool! To change your theme just right click on desktop» properties» appearances tab» Windows and buttons If the above method doesn’t work then don’t loose hope. Just download this multipatcher (no matter what service pack you have) and it might do the job for you! In case you are looking around for some Visual styles and themes here are some sites that might help you in the quest for the perfect style for you:
If you are unsure and want some more proof then you can find some here at uneasysilence.com


These themes will make your computer look like Windows Vista for sure. So… go ahead and download it. Then unzip or copy it to C:\WINDOWS\Resources\Themes All right now you can change your computers theme to the Vista theme you chose.. There are many msstyles themes out there that look super cool and look like vista/longhorn. You can also get shell packs and windows blinds themes but some people claim that this can mess up your computer badly. The theme that I found works best is VistaXP by -kol! (but it was so popular that MS got it removed).

some More Vista Components :

Changing the Wallpaper


There are lots of Vista wall papers available… chances are that you have one included with your theme as well. If you don’t then you can try your luck at WinMatrix’s great post for Vista wallpapers. If not then you can always search on Google for Vista Wallpapers. If you want you can also get this wallpaper which also a CoolGrass wallpaper by ApacheUser plus it has the Windows Vista logo on it!

Changing the cursor


You can download the aero cursor pack over here. Just read the read me file supplied and enjoy. Additionally, you can go to How to change your mouse pointers article and change your mouse pointer to the 3D-White (system scheme), it looks very similar to the original cursor in Vista


Getting Vista-ish applications

Now once you are done that. And you like some transparency on your computer get these two very cool tools. Vista Explorer: Something like the original Vista explorer but for XP and plus it has….. transparency. YES! IT IS TRANSPARENT! Just like the original one. Internet Explorer (transparent version!): This is also very similar to the real internet explorer. Plus the internet explorer button on the task bar says internet explorer 7 (good for fooling people)! You can also get the real IE 7 (no transparency though) Now your system should look like Vista for sure, but why stop when you have come so far?

Fine tuning

After that, fine tune your font settings and turn on ClearType fonts with the ClearType Tuner PowerToy . Since the real Vista uses the font ‘Segoe UI’ which is a cleartype font, you can mimic the real fonts by using ClearType. However, some themes already come with the Segoe UI font so don’t forget to enable it while you are using it.


Shell Packs

If you really want to get shell packs to do what you can already do on your own then here are some of them:


Please keep in mind that the shell packs don’t customize your computer to look like the latest Vista/Longhorn builds, so your computer might not look like the recent Vista versions.


The Vista Sidebar

Longhorn Sidebar into XP and put that on your computer too. And when you are done that you can start celebrating! In fact you can claim that you have Windows Vista already, and nobody will doubt you. One last step enjoy and don’t forget to show-off your new look!

MY NEXT TOPIC WILL BE ON??


Some cool Tips eh ?
i-hackedwithtech: Windows XP, Tips.....

This topic is ment for ETHICAl hacking!


Tweaking guide: How to speed up my PC for free ?

Wednesday, November 7, 2007

Based on feedback I get, it looks like PC performance is a major issue for many readers. This 5 step guide will help you to speed up your PC in minutes. Tips and tweaks provided are applicable to Windows XP and Windows Vista (unless else specified). I highly recommend that you use the following tips as your initial performance activity list when troubleshooting a PC performance issue.


Minimize the number of programs that run on startup

From time to time we install new software our PC. Some of those programs will run automatically when we turn on our PC (startup), causing a major degradation in our PC boot time and overall system performance. Moreover, spyware, adware and even malware (virus, trojans) might run on startup making your PC crawl. The Microsoft Windows System Configuration Utility (aka MsConfig) is a powerful tool that allows to select what programs will run automatically by default.

Usage is relatively simple:

1.Click the Start button
2.Vista Users: In the start search type msconfig and click Enter . XP Users: Click Run, then type msconfig and click Enter.
3.Navigate to the Startup folder
4.Uncheck any program you don’t want to run by default. Note: Make sure you don’t disable Microsoft programs.
5.Click OK
6.Reboot your system

Adjust your System Performance Options


Windows operating systems feature a constant tradeoff between visualization richness and system performance. The “prettier” you system look, the more it consumes its resources and thus the more likely is to start crawling and consequently affects your productivity


Both Windows XP’s and Vista’s basic configuration is optimized for best appearance. However if you set Windows to optimize performance, you’ll loose some (insignificant?) visual effects, such as the 3d toolbar, shadowed menus etc’, but you gain a lot in system performance.

Here’s how you can do it:

1.Click the Windows Start button
2.Right click Computer
3.Click Properties
4.Go to the Advanced tab
5.In the Performance section, Click Settings
6.Check the Adjust for Best Performance button

Note: If you really want to display some of the advanced visual effects Windows offers, you should click Custom and select the required effects .
Click OK .


Defragment your hard disk.


Defragmentation increases the speed your hard disk reads and writes information, thus improving your overall system performance. Therefore, it’s a good practice to defragment your hard disk partitions periodically (i would say, once in 2 weeks).


Here’s how to defragment your drive:


1.Click the Windows Start button
2.Right click Computer
3.Click Explore
4.Right Click each of your partitions (C, D etc’)
5.Click Properties
6.Navigate to the Tools tab
7.Click Defragment Now
8.Here you can schedule a Disk Defragmentation job or launch an immediate defragmentation job.

Hacking iPod and iTunes

Monday, November 5, 2007


Use a Pocket PC to record the “sounds” an infrared remote makes, transfer them to your iPod, and start changing channels with your new universal remote control.


We’re going to take an iPod and turn it into a universal infrared (IR) remote control, which can be used to control all your home electronic equipment, or just about anything that uses a remote control. For example, in my home, my iPod controls my TV, DVD player, Direct TV, Ultimate TV PVR, Media Center PC, Xbox, XM Satellite Radio, Roomba, and a few other random things, such as a robot. Figure 1-14 shows a variety of remotes your iPod can replace.


To do this, we are going to “record” the “sounds” an infrared remote makes on a PC and then put them on an iPod as songs. Adding a special sound-to- IR converter then turns those sounds back to IR and allows you to use your iPod as a remote control. As an added bonus, it works from up to 100 feet away. It’s a slick all-in-one unit, and you’ll never go back to using multiple remotes again.


Here’s what you’ll need for this hack:

.An iPod (doesn’t matter which one)
.A Mac or PC with sound recording software
.A Pocket PC (any Pocket PC 2002/2003 should work)
.Griffin’s Total Remote software and IR device ($24.99)


Getting the IR Signal:

The most important element is the sound-to-IR converter from Griffin, This device (and software) was meant to extend the range of Pocket PCs and add consumer IR capabilities. You are first going to use the Pocket PC software to input the IR signals from your remotes, convert these signals to sound files, and then use your iPod to play those sounds through the sound-to-IR converter to control your devices.


First, install the Total Remote software on your Pocket PC. Follow the instructions and start entering all the remotes you’ll ultimately want to use on your iPod. To keep this example simple, we’re going to begin by turning the TV on and off. pic


On the Pocket PC, choose Start ->Programs ->Total Remote. Then, choose Edit ->Start One-Shot Sampling, Pick the power button on the interface.


Total Remote prompts you to hold the remote (in our example, the TV remote) up to the IR port on the Pocket PC. This records the IR signal.


Once you’ve captured the IR signal, you can test it by using the IR device included with Total Remote. After you verify that it works, it’s time to get that IR signal off the Pocket PC and onto a computer as a sound file.


Recording the Signal:


from the Pocket PC to the microphone or line-in port. You can get a 3.5 mm stereo audio cable such as this from Radio Shack or any computer store. Many computers come with one to run sound out to speakers; that’ll work too.


On your desktop computer , use a sound-editing program that can edit sounds and remove channels (left and right). This example uses SoundForge ($399.00).


In your recording application, set the recording format to the following (this is really important):44 Hz, 16bit Stereo. PCM


We’re ultimately going to save the signal as a WAV (Windows sound file).
Press Record in the sound-recording application. Then, on the Pocket PC (with the line out from the headphone jack to the line in on the desktop computer), press the button to which you assigned the Power signal.


Stop the recording and press Play. If you recorded the signal properly, you’ll hear some weird beeps and pulses. That’s what the IR signal “sounds” like. In SoundForge, you can actually see the pulses and signal on a WAV graphic.


Next, highlight the right channel and mute it. If you skip this step, the sound won’t process through the IR device properly.


Now, save the sound recording as a 44 Hz, 16 bit Stereo, PCM WAV file. We called ours power.wav


Putting the Signal on the iPod:


Pop your iPod in the cradle. In iTunes, make a new playlist (I called mine TV) and then add the WAV file to the playlist, as shown in Figure 1-20.


The file transfers to the iPod, and we’re ready to test our new remote


Ready, Aim, Fire:


Remove the iPod from the cradle and put the Total Remote IR device in the iPod’s headphone jack.


Go to the playlist and point the iPod at the TV.

Click Play. If you’ve done everything right, your TV should turn on and off each time you play this sound. Go backhand input all your other devices. Congratulations! You can now control your TV—or anything else, for that matter—with your iPod.


Keeping your computer in tip top shape.

Sunday, November 4, 2007


PLEASE READ ALL OF THIS BEFORE DOING IT :


1. A computer gets dusty inside. Clean it out. I would recommend using compressed air in the cans (because it has no moisture in it) and taking the tower outside, and blowing it out. DO NOT VACUUM unless you know what you are doing. The static electricity can ruin the electronic components in the system.


2. While cleaning, removing the cards and blowing the slots they are in is also a good thing to do. Be sure to use static bags or something that does not generate static electricity when setting down the components. You can do this one at a time, or you can do them all at a time. REMEMBER WHERE EACH CARD GOES. If you don’t, sometimes Windows will want to re-install the drivers, and it’s a pain.


3. After you are done cleaning out the system, plug it in without the side panel on, and verify that each fan works (Processor, Power supply, Video (may or may not have one), any fans on the inside of the tower itself)


4. Be sure to run the Spyware removal tools frequently (once a week), AdAware6, Spybot and CClean as Spyware will cause your system to run slow. They can be found here:


5. Go through your add/remove programs at least every month (once a week if you install a lot of things) and remove anything you don’t use anymore. If you are unsure about what a certain thing is, leave it in there until you can find out further information about it.


6. A computer will run a lot faster after a format. If you have the resources (hard drive space on a spare drive, or a friends computer you can network to), and you also have knowledge on computers, it is a good idea to format the main drive (the one containing your windows install) and reinstalling windows. Before reinstalling, write down the serial numbers of all your cards inside your computers, along with brand names, do the same for your mainboard. Back up your documents, mp3s, anything that is NOT A PROGRAM onto a spare drive or CD/DVD. BE SURE TO KEEP A COPY OF THE NETWORK CARD/MODEM DRIVERS BEFORE YOU FORMAT, if you do not, you may not be able to access the internet again. Do the format and reinstall then update everything for drivers from each website (so you have the most up to date).


I would do motherboard first (ALWAYS), then Video second, because then you can go into higher resolutions. If you are having troubles finding a driver, go to the DriverGuide web site and use the L/P: drivers/all. Once all the drivers are up to date, update your windows using Windows update. Be sure to update DirectX also. After everything has been updated (Direct x, drivers, windows), begin to re-install your software, then copy your files back over from the backup you create.


How to Prevent "Hacking"

Friday, November 2, 2007


First off most hacking is not hacking at all, normally what happens is that someone gives their log on to some one they trusted, or a friend.If you do buy an account from someone, make sure that the person has a "good" rating, or that the person no longer has the CD key.


With that said, there are the few incidents of "true" hacking , and we will go over ways to help prevent them.


1.) Tricks of the trade:

There are several tricks that people may use to get your info. One of the questions to change your password is commonly," what is the name of your pet?" Now this one is pretty slick, for the mere fact that this infact does come up in a normal conversation. A simple solution would be just to say, "I don't have a pet", or use the name of a niece or cousin instead. This can go hand in hand with making "look at my new puppy his name is spot" type posts.


2.) Cookies/malware/data ware:

One of recent advents of the internet is tiny programs that install themselves without your permission. Typical virus scanners do not yet have the capability to remove these programs and that's because Anti-Virus software don't consider AdAware6 to be viral. The tool that I use to remove these programs is AdAware6, it is a free download and simple to install and run. You can use any Spyware remover you would like as well, another coukle highly recommended tools are Spybot. and CClean, Make sure if you do get these, that you update , and run them on a regular basis. Another way to prevent people getting information on you is to delete your cookies on a regular basis. you can do this by going to the top of your internet explorer screen.


3.) Virus scanning:

The title itself you should be enough. Get a good virus scanner. I would not suggest using a free/shareware one, as the money spent on this type of program is worth every red cent. I use Norton 2003 Pro myself and love it. UPDATE YOUR VIRUS DEFINITIONS OFTEN. you should be at least checking for updates 2 times a week. Hackers work full time it doesn't take more then 5 min to click "Update now".


If you are after a Firewall as well then don't assume your Anti-Virus software has one. In general, antivirus software doesn't come with a firewall. In the case of Symantec's products, you need to purchase the antivirus/firewall package to get both. McAfee also has bundles. But if you just buy Norton Anti-Virus or McAfee...uh...whatever they call it, you only get the AV software.
My next updates will be on TIPS AND TRICKS AND HOW TO UPDATE THE ANTIVIRUS.